First Time Visitor Guide To Mt. Rainier National Park

My cousin, Christian, at Louise Lake in Mt. Rainier, Washington
Hey everyone, glad to have you all back! This time I’m excited to share with you all my experience as a first time visitor to Mt. Rainier National Park located in Washington. This location is special to me because it’s my first national park I’ve visited along the Pacific Northwest and I got to share this trip with my cousin. In today’s blog, you’ll read more about:
My hiking gear, camera gear, and apparel pack list
An itinerary I used including recommendations on trails to explore and what to expect for each trail
Tips for photo opportunities and settings I used for each of my photos
With that set, let’s get right into it!
Things To Know Before You Go:
Mt. Rainier National Park became the 5th oldest national park in the United States after the bill was passed in 1899. The park itself has seen much change throughout the years, however tourism continues to remain strong. From viewing vast landscapes filled with wildflowers and wildlife, to rising above towering peaks and points, and daring to reach Mt. Rainier’s summit means there’s something for everyone. At the time my cousin and I went we planned the trip from Sunday to Wednesday to beat the weekend crowds in the park and avoid long wait times.
Traveling to the park isn’t too bad as there’s multiple entrances from different sides of the park. The north entrance starts from Tacoma and leads to the Sunrise region by following Highway 410. The west entrance follows Highway 7 and connects to Highway 706 while cutting through Ashford and leading to the Paradise region. The east entrance can be accessed either by following Highway 410 or by taking Highway 123 from Packwood. If you’re planning to visit the park for the first time then you can find accommodations in the park itself, or stay at an Airbnb in a town close to the park like Ashford.
The drive from Seattle to Mt. Rainier was just under two hours away without traffic. From Seattle to the town of Ashford (which is the town right before the western entrance of Mt. Rainier), takes about an hour and a half. The reason why my cousin and I decided to stay in Ashford is because it had reasonably priced accommodations and it’s a quiet little town with direct access to the park. The downside of residing in Ashford is the cell phone reception is not great. After we drove past the town of Eatonville (which is the town right before Ashford) our cell phone reception was pretty much non-existent with an occasional single bar of reception every now and then.
*travel tip - download a map of the area you’re visiting onto your phone. Although I couldn’t access Google Maps,my cousin planned ahead and secured our routes with estimated travel times with a downloaded map!
Weather:
The temperature in Mt. Rainier National Park in August for a typical day ranges from a high of 75°F during the day to a low of 50°F at night. Expect the fog to roll in the morning and block vision of the roads. Overcast is also a possibility with large clouds looming overhead with strong sunlight peeking through the pockets. While the temperatures looked appealing on paper, what we didn’t know beforehand was the haze that permeated throughout the park due to the fires the week before our trip. We ended up with the short end of the stick for the first two days as the Air Quality Index (or AQI for short) levels were at an unhealthy level. For more information about AQI levels check out AirNow.gov to learn more and plan ahead.
Couple things to note about the haze at the park:
The incoming sunlight is blocked by the haze, reducing temperatures.
The hazy atmosphere created an orangey glow in the woods and further accentuated the different shades of blue tint on the overlapping mountain ranges. Unfortunately the haze was quite strong for the first two days to the point where we weren’t, or barely able, to see Mt. Rainier.
People who are sensitive to poor air quality should limit their time outside. During one of my 5 hour long hikes throughout the week, I found it difficult to take deep breaths without feeling some sort of irritation in my throat.
On another note, although not too common in the summer, there may be chances of rain or drizzle. There were a few instances after checking my weather app that rain may be coming in the next couple of days. Luckily we didn’t get hit with any rain, but when it comes to gear it’s best to bring things that can serve multiple uses across a wide range of activities. And on that note, it’s a perfect time to segue into gear!
Gear To Bring:
Like within my prior blog posts, you’ll notice some gear I mentioned before that has now become my staple whenever I travel. Below is my hiking essentials list, in addition to other items I would recommend as well.
Hiking Essential Packlist:
Water Bottle or Hydration Pack
20L Daypack - something with a hip belt preferred
24-70mm Camera Lens
70-200mm Camera Lens
DSLR or Mirrorless Camera
America The Beautiful Pass
Polarized Sunglasses
Hiking Shoes
Windbreaker
Lightweight Hiking Pants
Wool Socks
Optional Gear To Pack:
Trekking Poles
Sunscreen
Insect Repellant
Sun Gloves
Anti-blister Patches
Sunhat
Apparel:
When it comes to my gear I tend to stick with certain brands because I find they work best with my needs. I’ll include some links to the gear I use as I go along my list.
Moisture Wicking and UPF T-Shirts
Starting off with base layers, the Patagonia Capilene Hoodies, Longsleeves, and Tees are undoubtedly my best and highest recommendation for a summer/hiking shirt. The entire line of capilenes manages odor pretty well, easily wicks away moisture leaving the material light and airy, and comes in multiple different styles depending on your preferences.
Lightweight Hiking Pants:
During the summer periods I need pants that are lightweight and durable. Having some sort or moisture wicking or water repellency built into my pants is also a big plus! My default hiking pants are the Rab Incline Light Pants since it checks all these boxes. The other pair or technical pants I tested during this trip were the Patagonia Altvia Alpine Pants. It also checks off a couple of my needs boxes, but what I like about these pants is how there’s extra reinforcement built into specific parts of the pants. Not to mention, they provide great stretch fabric and come in different colorways and sizing options.
Lightweight Windproof Jacket:
For my jacket recommendation, I’d recommend bringing a windbreaker. Windbreakers are especially useful in alpine settings where you’re hiking in open environments with little natural protection and where the winds are harsh. The Borealis Jacket by Rab is my default windbreaker as it’s both easy to compact and super lightweight. I especially like how this jacket has parallel zippers on the chest instead of the zippers located on the sides of the body. This nifty feature is quite useful as I can easily slip things in and out of my chest pockets without having to drop to my sides and fumble through managing my inventory.

Waterproof Boots And Wool Socks:
As for footwear I would bring wool socks and a great pair of hiking shoes. Keep the cotton socks at home and invest in wool socks as this kind of material is better at regulating foot temperatures while reducing the chance of blisters. My preference for wool socks are from Smartwool. They have a great selection of styles and cuts to choose from. What I find great about Smartwool too is how they have a wide range of apparel and accessories as well. When it comes to my shoes, I prefer a higher cut with my boot. The Danner Panorama Mid Waterproof is my go to hiking shoe since they’re waterproof, lightweight and cushiony, and hold up well on rocky terrain.
Shot on Canon R8 - Danner Panorama Mid Waterproof
Shutter Speed: 1/500sec
Aperture: F5.0
ISO: 100
Lens: Sigma Art EF Mount 24-70mm F2.8
Wool Baselayer Shirt:
As for the last item, I recommend keeping a wool base layer packed. It can be pretty cold at night and in the mornings, so I opted for the Smartwool Classic Thermal Merino Base Layer Crew as my sleeping shirt to defend against the cold.
That pretty much sums up my essentials clothing list. Below you’ll find a list of gear I brought along with me that certainly helped with the hikes, but aren’t necessary. Links below will be provided if you’re interested in learning more.
Auxiliary Gear:

Hiking Poles:
To tell the truth, I didn’t believe in hiking poles until I went on this trip. When my cousin brought them along, I initially thought, “why not just use a wooden stick I can find in the forest instead of spending money on a pole?” I’ll admit, the TrailBuddy Trekking Poles are some of the best pieces of equipment I used. I find trekking poles to be useful in situations like:
Distributing your weight when climbing or descending. They help alleviate strain on the knees and grant more stability.
Probing the ground to find a stable surface to step on. In the case where I was descending down trails with deep drops, poking around with the stick first helped me ensure the ground was stable without risk of the earth underfoot giving way.
While yes any stick found in the woods can help with hiking, not all sticks are made equally. Wooden sticks aren’t meant to be durable, flexible, or light. The technology for poles nowadays is becoming lighter, sturdier, and more compact. My recommendations for hiking poles include the TrailBuddy, Leki, and Black Diamond.
Shot on Canon R8 - Afternoon Hike On Skyline Ridge Loop Trail
Shutter Speed: 1/400sec
Aperture: F4.0
ISO: 100
Lens: Sigma Sport EF Mount 70-200mm F2.8
Sun Hat:
My go hiking hat would be the Sunday Afternoons Ultra Adventure Hat. Unlike traditional full brimmed sun hats, this hat is made to be stowable and can easily slide right into a slot within a day pack. The back portion of the hat drops to help cover the neck, keeping it shaded and protected from anything trying to get in. To round it off, this model has vents running along the top portion of the hat to help with ventilation.
Sun Gloves:
I love using sun gloves because they provide protection from the sun in addition to anything else I make contact with on the trails. Outdoor Research Sun Gloves are perfect because not only are they UPF 50 rated, but they also keep my hands cool while I’m out. I initially thought they would get in the way when I grip my hiking pole and hold my mirrorless camera, but that wasn’t the case. Thanks to the grippy palm of this pair of gloves, whatever I grab ahold of tends to stick really well.
Bug Spray or Bug Wipes:
Pretty self explanatory. Any sort of bug spray will do, but I prefer to pack Deet wipes by Ben’s. These wipes can slip into any pocket within my daypack as opposed to having a bottle that doesn’t slip as easily into every pocket of my pack.
Sun Glasses:
On a clear, blue, beautiful bright day I would highly recommend bringing a pair of sunglasses. My best travel pair has got to be the Polarized Clubmasters by Ray Ban.
Sunscreen:
Another pretty self explanatory item. I’d say it’s more of a nice to have item to bring along as there’s clothes with built in UPF nowadays.
Hydration Pack Or Bottle:
No longer are the days I bring a Hydro Flask with me on a hike because I find to carry more cons than water over the years:
Hydro Flask bottles up to 40 fluid ounces can fit snugly into a side pocket of a day pack. However, if I want to carry more than 40 oz then the size of the bottle becomes too wide and tall to fit into a side pocket. This would force me to hold onto my bottle and I wouldn’t want to do this for extended periods of hiking.
Although Hydro Flask has their trail series, a lighter weight 40oz bottle is still not going to be enough water on a 4+ hour day hike. One of my pet peeves is carrying around an empty water bottle that’s taking up space within my daypack that I can use for something else.
In the search for a new hydration pack, I’ve come across the Hydrapak Seeker series. Being able to carry more water and pack away my mendable bottle is a dream come true. I wouldn’t have to worry about bringing too little water and I can fold up my bottle without it taking up too much space as I empty out the tank. The only glaring con I’ve experienced with this type of container is that it doesn’t keep my liquids insulated.
Camera Gear:
When it comes to my camera gear I’m deeply invested in the Peak Design ecosystem. I strongly believe their gear can be used as both an everyday carry and an everywhere carry. Below is my backpack setup for this trip in particular:

Shot on Canon R8 - Standing Atop McClure Rock
Shutter Speed: 1/4000sec
Aperture: F2.8
ISO: 200
Lens: Sigma Sport EF Mount 70-200mm F2.8
The 20L Everyday bag is my “everywhere bag”. It’s enough for me to carry two zoom lenses, a single camera body, my 3L hydration pack, and other auxiliary items with ease - all the while securing my gear in a durable, weatherproof material. One of the latest additions to my gear is the Peak Design Everyday Hip Belt. I absolutely love this because it helps distribute most of the weight from my daypack to my hips instead of my shoulders holding the load.
For easy, hands free carry and to help me get off some quick shots in a pinch, my favorite external carrier for my camera is the Peak Design Capture Clip. This versatile piece of metal can hook onto any backpack in or outside of the Peak Design ecosystem. Although I can clip this onto my hip pack and have the camera weight sit on my hip bones, I prefer to clip it onto my shoulder strap to avoid risking the camera banging into something.
As for my lens setup, I can’t leave home without my Canon R8 and Sigma 24-70mm Art Lens EF Mount. The combination of these two makes for my “do it all set up” From landscapes, to portraits, to everything in between, I can cover a wide range of different types of photography with this one pairing.
Where the 24-70mm lens falls short on is the extra reach, I can easily make up for it with the Sigma 70-200mm Sport Lens EF Mount. I usually don’t bring this with me since it’s heavy and takes up a third of my bag space in my 20L carry, but I’m so glad I did. Where I find this lens truly shines is taking pictures of wildlife. Having upwards to 200mm to play with is so nice since I can avoid disturbing animals in their natural environments and take shots from afar. Coupled with the Canon R8’s eye auto focus capabilities, I can take sharp images without compromise.
Gear To Avoid:
I wanted to throw this section in here because there were multiple occurrences over the course of 4 days of seeing people bringing the wrong gear on a long hike.
Leave the running and tennis shoes off the mountain path - Bringing running shoes that aren’t designed for the trail or shoes made for casual wear are the most common mistake I see people make on hikes. The outsoles on these types of shoes are usually on the flatter side and don't provide a lot of grip compared to a hiking boot. This can make traversing on rocky or slippery terrains difficult. While the construction of the shoes themselves are breathable they are flimsy. One wrong bump into a rock while wearing a running shoe will hurt. Some of the best brands to invest in hiking shoes would be Danner, Salomon, Columbia, and Merrell.
Best to leave the cotton tee-shirts at home - Cotton tees (or cotton clothing in general) aren’t going to be your best friends on a hike. For starters, they soak up water a little too well and aren’t good at wicking away moisture when needed. This leads to a heavier shirt and more discomfort over time. Instead, invest in more technical tees that are lighter, more breathable, and can wick moisture from brands like Patagonia, Outdoor Research, and Columbia.
Itinerary For A 2 - 4 Day Trip:
When I planned my trip to Mt. Rainier, I planned on being there from Sunday to Wednesday to avoid larger crowds and traffic. Since I stretched out my trip to 4 days, I spent the first couple of days exploring the Paradise area with another day devoted to exploring the eastern portion of the park. My strategy going into this trip was to have an early start (get to the park by 6am) and early end (head to bed at 9pm). Below, I’ll be sharing some of the hikes that I’ve done including pointers on what to expect from the trail and photography tips.
Day 1 - A Day In Paradise:

Hazy Morning At Mt. Rainier, Washington
Spend the day exploring the Paradise region. My cousin and I had a later start to our day which meant we got to the Jackson Visitor Center at 2pm in the afternoon. Along the windy scenic Paradise Valley Road heading up to the center from Ashford, there’s plenty of opportunities to stop at many lookout points and waterfalls. Since the AQI levels were bad that day, it was hard to see far out into the landscapes as the haze obstructed our vision from high elevations.
At the visitor center you can expect to find more information about the park’s history, replenish at the cafeteria, buy souvenirs from the gift shop, and find the starting point to Skyline Loop Trail. Speaking of the gift shop, it’s pretty small with tons of foot traffic so it can be hard to move around in. If you’re looking to pick up some souvenirs, I’d suggest going to the Longmire General Store instead. It’s on the way to the visitor center. It’s a bigger store with a wider selection of apparel, packable meals and drinks, and other little knick knacks.
After spending about 30 minutes at Jackson Visitor Center, we decided to spend the rest of our afternoon visiting some lakes before the sun sets. The first stop on our list of lakes was Reflection Lake. Just a 10 minute drive from the visitor center, this is a popular photo spot as the lake would reflect an image of Mt. Rainier on the still waters. Thanks to the fires the week before, we didn’t have a great opportunity for a photo because the haze was so strong. The best times to visit Reflection Lake would be either at sunrise or sunset when the waters are calm and still.

Although we couldn’t get the shots we wanted, we continued on the road and headed to Louise Lake. The drive itself wasn’t too bad, a simple 5 minute drive from Reflection Lake. Don’t worry about finding parking since there’s plenty of shoulder space along the side of the road just outside Louise Lake. After following the beaten path to the lake, you’ll be greeted with a giant opening and blue waters. Out of all the lakes I visited on this trip, Louise Lake was one of my most favorite lakes as it doesn’t get a lot of foot traffic and the waters are cool enough to take a comfortable dip in. If you’re feeling extra adventurous, you can bring a SUP board on the lake as well.
Shot on Canon R8 - Hazy Afternoon At Louise Lake
Shutter Speed: 1/1600sec
Aperture: F3.2
ISO: 100
Lens: Sigma Art EF Mount 24-70mm F2.8

To round off our day hiked at Bench and Snow Lake. The Bench and Snow Lake Trail is an out and back style trail which means you will go back the same way you came in. It’s one of the less strenuous trails compared to everything else in the park. However, There’s plenty of steep drops, unstable foot holds, and tree roots littering the path. If you have trekking poles on hand, I’d say this is one of the best trails to use it on to help find your footing. Although the path isn’t terribly rocky either, you can expect to kick up a lot of dust as you hike through. Luckily, we didn’t have any issues with insects along the way or major encounters with wildlife along the way. Once you reach the end of the road and hit Snow Lake, you’ll be in for a pleasant surprise as there’s small snakes and tadpoles lurking alongside the water’s edge.
Shot on Canon R8 - Clearing At Snow Lake
Shutter Speed: 1/250sec
Aperture: F4.0
ISO: 100
Lens: Sigma Art EF Mount 24-70mm F2.8

*photo tip: it was pretty hazy at the time we went. The haze provided a great orangey glow to the scene, so I knew that was something I wanted to enhance within my photos. In post editing, I used radial and linear gradients in combination with increasing the whites, increasing the temperature, adding more haze, and reducing the clarity to further enhance the natural haze.
Shot on Canon R8 - Hazy Afternoon On Bench And Snow Trail
Shutter Speed: 1/400sec
Aperture: F4.0
ISO: 100
Lens: Sigma Art EF Mount 24-70mm F2.8
Day 2 - Skyline Trail:

Early Morning Hike On Skyline Ridge Loop Trail

Leave early and spend the morning to early afternoon exploring Skyline Ridge Trail. We started our hike at 6:30am and ended our hike at 1:30pm. I’d suggest going clockwise instead of going counter clockwise because you’ll get a much better view of Mt. Rainier all the way through until you pass Panorama Point and circle back to the visitor center. The other reason why I suggest the clockwise start is because there’s more opportunities to encounter wildlife like deer, marmots, chipmunks, and sooty grouse. My best tip when starting out really early is to keep your voices down so as not to alarm wildlife. Keep in mind the deer aren’t out as much during the day once more people start hiking the trail. However, since we left early we had a chance to catch some deer grazing on the pastures just 15 minutes into our hike.
Shot on Canon R8 - Start Of Skyline Loop Trail
Shutter Speed: 1/100sec
Aperture: F5.0
ISO: 100
Lens: Sigma Art EF Mount 24-70mm F2.8
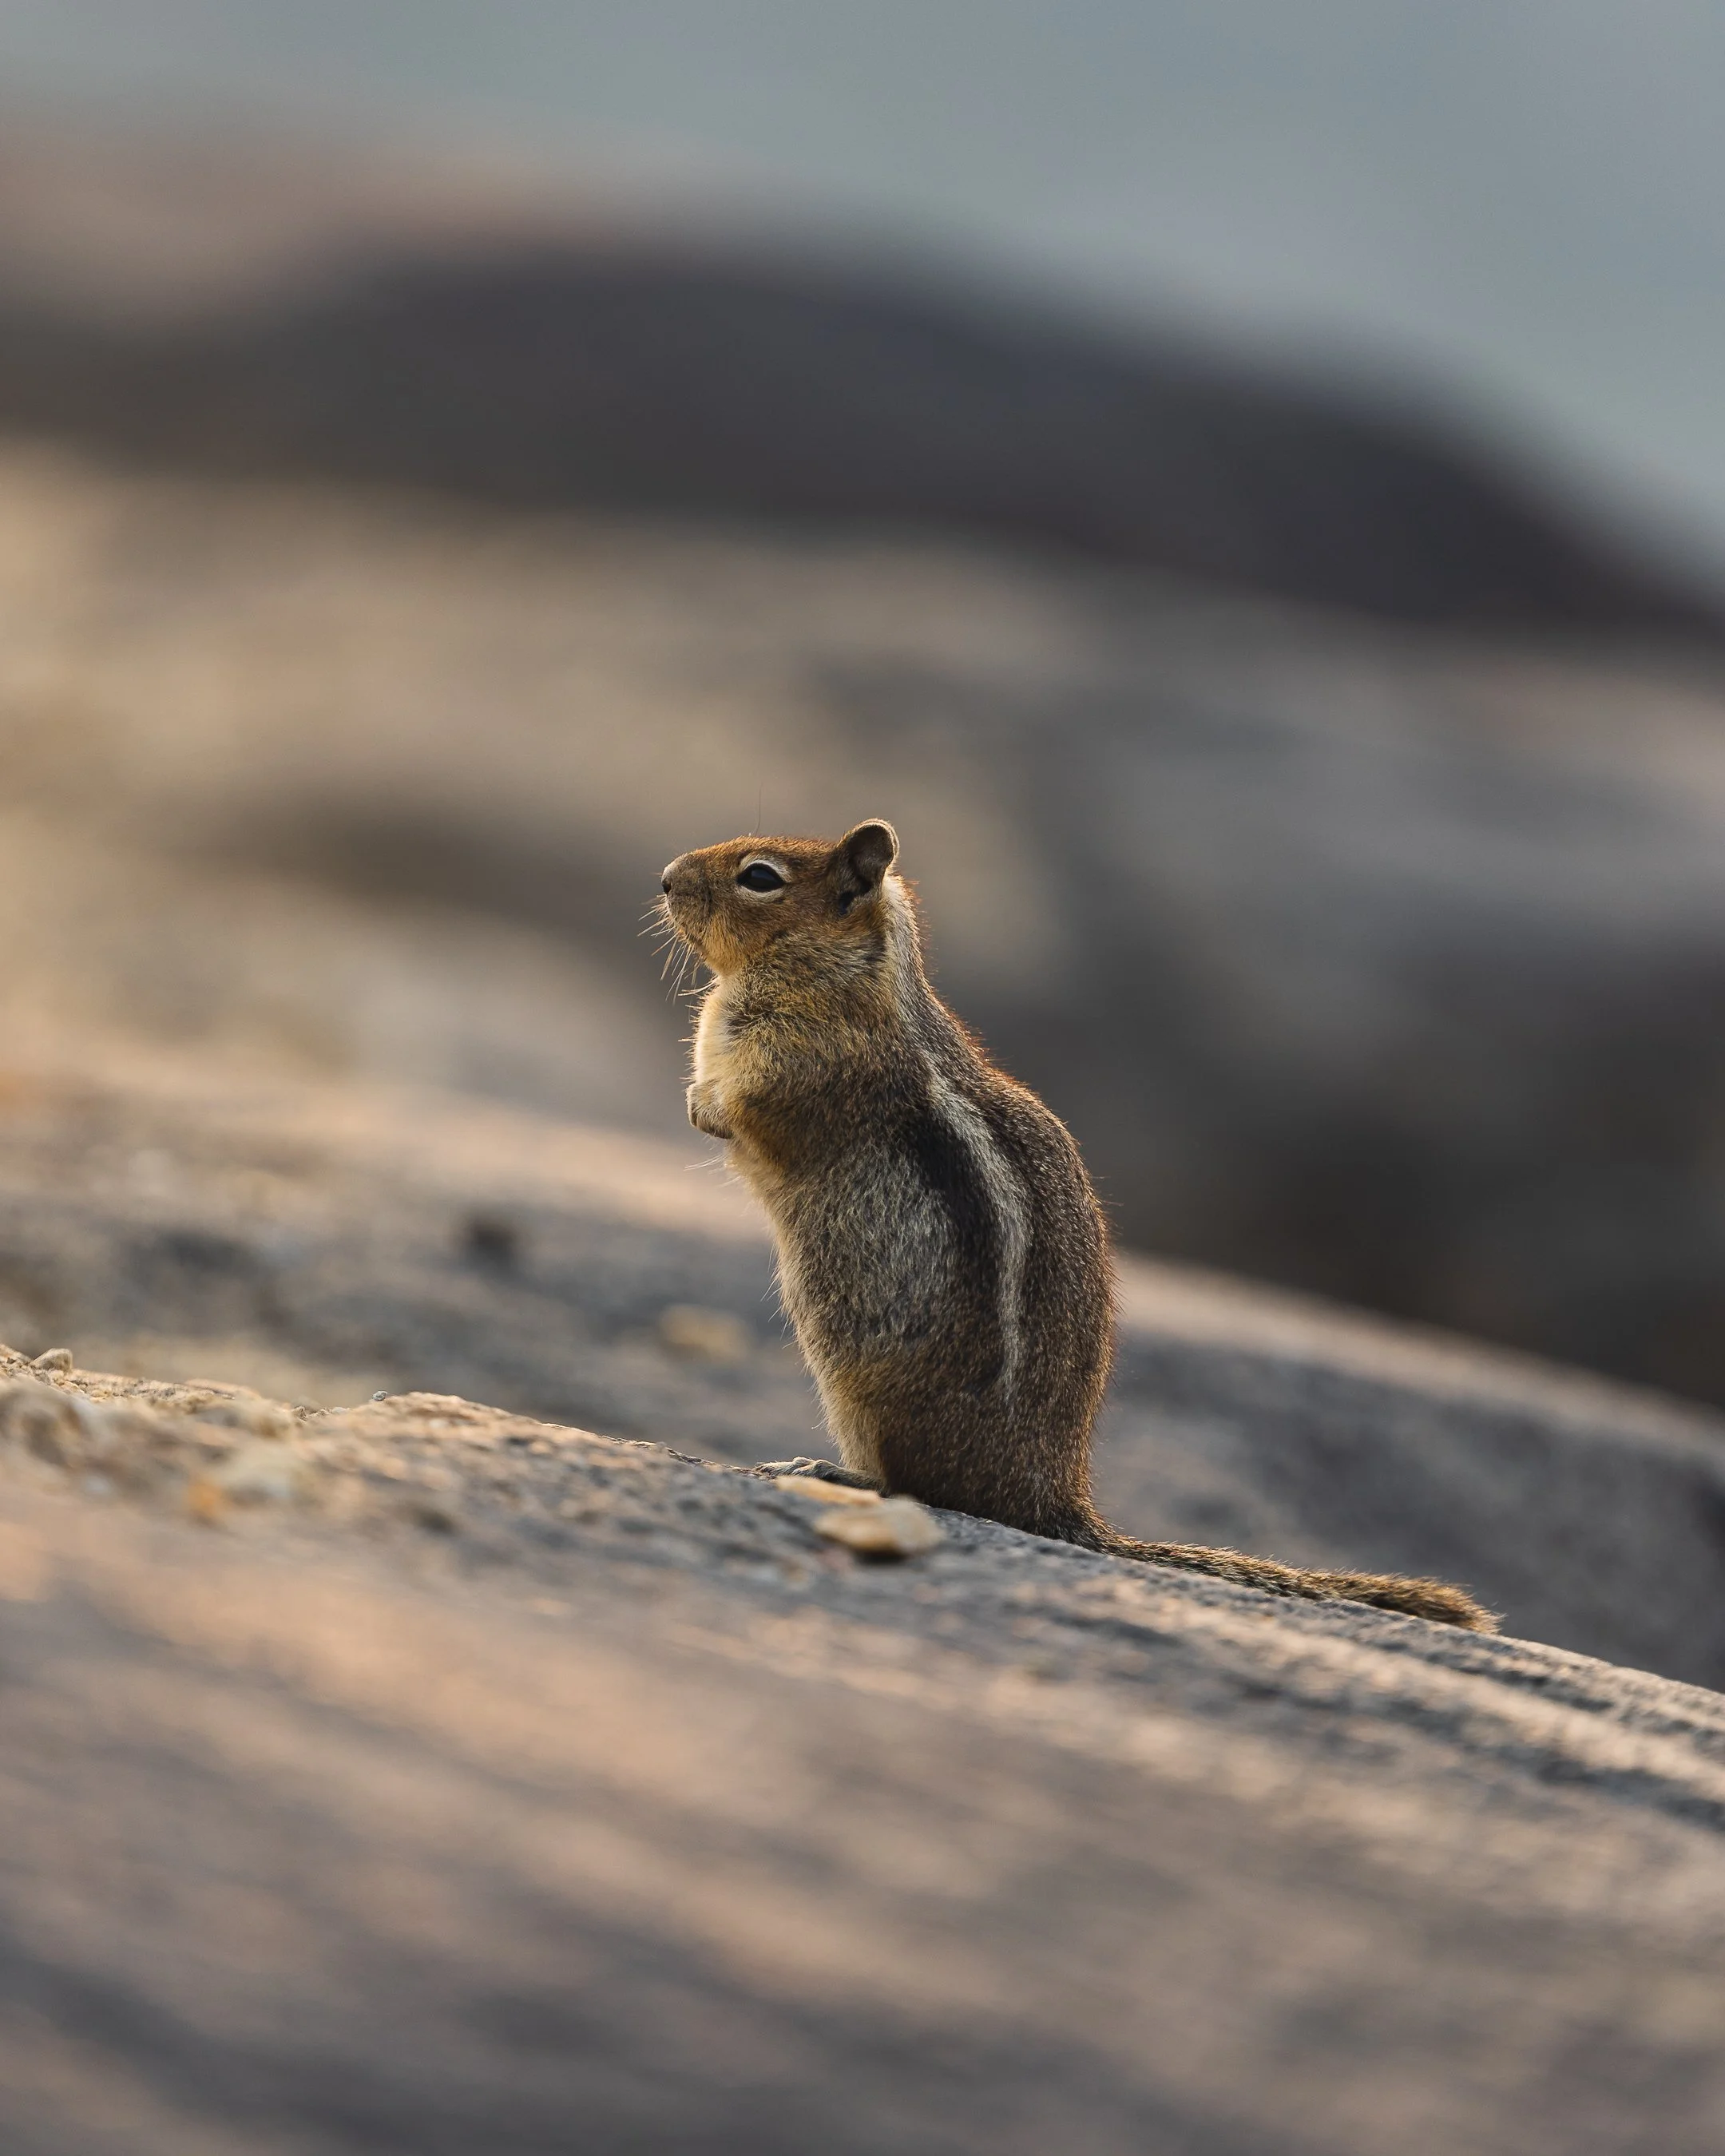
Like with the deer, the animals I’ve listed so far are pretty docile in nature and don’t tend to approach people. The chipmunks on the other hand are more interactive and will approach you whether you have food or not. The marmots are easy to approach as they tend to keep to themselves while they feed and rest on rocks. However, don’t get too close as they will scurry off and hide away in any nearby burrow. With the female and male sooty grouse we encountered, they weren’t aggressive even though we crossed paths. As a general tip, just let the wildlife pass by and all is good.
Shot on Canon R8 - Townsend Chipmunk In The Morning
Shutter Speed: 1/1000sec
Aperture: F2.8
ISO: 100
Lens: Lens: Sigma Sport EF Mount 70-200mm F2.8

*photo tip: pack and start with a 70-200mm lens at Skyline Loop Trail. At the time I started, I had the 24-70mm on my camera but instantly regretted it as I didn’t have the reach to take a shot of the deer. A longer reach with the 70-200mm will provide you more than enough reach to capture shots of wildlife from afar. To ensure you have your camera on you at all times without carrying it in your hand, use a capture clip, like one from Peak Design.
Shot on Canon R8 - Female Sooty Grouse On Skyline Ridge Loop Trail
Shutter Speed: 1/640sec
Aperture: F2.8
ISO: 200
Lens: Lens: Sigma Sport EF Mount 70-200mm F2.8
Throughout the trail leading up and to Panorama Point, you can expect a mix of different environments from steep inclines, rocky and unstable paths with deep drops, to clear outings with wildflowers populating green meadows. My highest recommendation after reaching Panorama Point Overlook is to follow the trail to McClure Rock. The hardest part about getting to McClure Rock is the path leading up to it is not well defined and you need to blaze your own trail. Trekking poles are very useful in this portion of the hike as there’s plenty of loose, small sharp rock slabs that can give way if stepped on.
Shot on Canon R8 - Trailblazing At McClure Rock
Shutter Speed: 1/2000sec
Aperture: F2.8
ISO: 200
Lens: Lens: Sigma Sport EF Mount 70-200mm F2.8

McClure Rock is one of my favorite viewpoints as this is a secluded location with vast open views of the landscape. It’s simply an absolute treat as the only sounds present are the whispers of the high winds. Truly, this is an experience where the body is in tune with nature without any interference from heavy foot traffic. Thankfully, we had some snacks on hand to have a little lunch break over a view.
Photo: Lunch Time At McClure Rock
Trail Butter, Skratch Labs Energy Chews, Go Macro Macrobar from Sports Basement
After we wrapped up with McClure Rock around noon, we made our way down the mountain. By the time we descended down the mountain many more hikers started to appear which also meant the chances to see wildlife became much lower. While continuing down the trail from Panorama Point Overlook, the trail became rockier and steeper with the only views ahead were of the surrounding wildflowers blooming along the creeks trickling down the mountain.

By the end of our journey around 1:30pm, the parking lot at Jackson Visitor Center was filled with cars spilling onto the shoulders and overflow area. To round off our day, we spent dinner at Wildberry restaurant where we got some delicious Nepalese food!
Photo: Khukura (Chicken) Thali Rice Plate
Day 3 - Tipsoo Lake, Naches Peak, and Lake Dewey:

Rolling Fog At Tipsoo Lake
We started very early and drove an hour and a half from our home base in Ashford to visit Tipsoo Lake located on the eastern portion of the park. The first half of the road leading to Tipsoo Lake, Route 52, is windy and narrow which can make it difficult to share the road and spot incoming cars rounding corners. Cutting through the small town of Packwood and continuing onto Route 123 is straightforward as the road begins to widen and straighten out. Navigating the windy path of WA-410 from Route 123 can be tough as the morning fog rolls through - obstructing visibility on hairpin turns.

Upon entering the Tipsoo Lake area around 6am, I found it hard to believe that a place like this can be found in Washington. The morning fog hovering above us blocked out the sun rays and engulfed everything as it continued its descent over the still waters of the lake. With little to no visitors at 6am, the area is quiet without a sound to be made, not even the presence of wildlife could be traced in these deep green saturated woods. The absence of ripples within the deep murky waters hinted at the idea that life under the surface has yet to emerge.
Shot on Canon R8 - Morning Fog Over Tipsoo Lake
Shutter Speed: 1/250sec
Aperture: F5.0
ISO: 320
Lens: Sigma Art EF Mount 24-70mm F2.8
As we looped around Tipsoo Lake, we noticed different types of foliage including small plants that look like miniature trees from Dr. Seuss’s The Lorax coupled with fields of flowers. With not much else happening around the lake except the fog slowly covering everything it can, we made our way to Naches Peak Loop Trailhead. The Naches Peak Loop Trail can be a confusing trail to start. What we didn’t know beforehand was how it shares part of the Pacific Crest Trail (or PCT for short). From the trailhead it branches off into different parts of the woods. Any path heading into the woods is a red herring and should be avoided. As long as you keep to the rocky, dirt path alongside the mountain then you will be on the right path.

Take your time to explore Naches Peak Loop Trail as there’s many types of scenes to take in during the hike. With the weather on our side this time around, we experienced blue skies hiding behind large bodies of clouds acting as a natural soft box. If you’re just doing the Naches Peak Loop Trail, you’ll have the opportunity to pass by unmanned, smaller lakes and direct access to Dewey Lake.
Shot on Canon R8 - Unnamed Lake At Naches Peak Loop Trail
Shutter Speed: 1/320sec
Aperture: F5.0
ISO: 100
Lens: Sigma Art EF Mount 24-70mm F2.8

Dewey Lake is an unexpected surprise as it’s quite secluded and only accessible by foot. The path leading to Dewey Lake can be a challenge to descend as the path is littered with rocky slabs making for unstable ground. After the tricky rocky hairpin turns, the climb down mellows out to large looming trees covering the rest of the path up until the lake opens.
Shot on Canon R8 - Lake Dewey, “Big Dewey”
Shutter Speed: 1/2500sec
Aperture: F2.8
ISO: 100
Lens: Sigma Art EF Mount 24-70mm F2.8

Dewey Lake itself is divided into two separate bodies, connected together by a small stream that acts like an umbilical cord connecting the main body to the child. Standing up close to the larger body of the two, I can recall Dewey Lake brimming with life. A vast body of blue water with uniformed waves batting against the shore felt like things in nature were working in perfect harmony. With little foot traffic and few clusters of people camping by the waterfront, Dewey Lake is a backpackers' best getaway from the hustle and bustle of city life.
Shot on Canon R8 - Lake Dewey, “Smaller Dewey”
Shutter Speed: 1/400sec
Aperture: F5.0
ISO: 100
Lens: Sigma Art EF Mount 24-70mm F2.8
*photo tip - along this trail there’s overcast moving at a fast pace which means the lighting conditions can change at any time. While overcast can provide protection from the sun, it can act as a natural softbox as well. Pay attention and anticipate how the light travels along a particular path when taking pictures as it can help emphasize and distinguish different types of subjects from the background.
After our escapade into the unknown, the trail heading back to the parking lot by Tipsoo Lake wasn’t too bad. At the intersection where Naches Peak Loop Trail breaks into two separate trails, the rest of the hike back was smooth sailing as it’s all a gradual decline.
"Best part about a daytrip is you don't have to sleep on the ground." - random hiker on the Naches Peak Loop Trail
Day 4 - Comet Falls:
We started early for Comet Falls trail since parking at the trailhead can be hard to get. This is an out and back type of trail that will take on average 2 and a half hours to complete for a round trip. From all the hiking I've done over the days prior, I’d say Comet Falls had to be the most challenging trail. From the get go the beaten, rocky path that’s littered with tree roots gradually ascends. As we walked through the forest, the 6am fog rolled over the deep green trees covering any and all sunlight from entering. Other than the sound of the rushing water cutting through the land, the open valleys were quiet and peaceful. There’s different flavors of life populating along the trail path as bright red berries and colorful flowers peek out of the rocks while hanging peacefully over the trail’s edge.

Speaking of the different flavors of life present at Comet Falls, I’d say this trail is ideal for landscape and wildflower photography. At the time we went, the only type of wildlife we encountered were the little brown pikas hiding under the rock slabs and deep burrows. Careful not to make too much noise and slow down your pace when navigating the open, rocky areas as you may hear the sound of a tiny squeal - signaling the pikas are present.
Shot on Canon R8 - Wildflowers Over The Edge
Shutter Speed: 1/160sec
Aperture: F3.5
ISO: 320
Lens: Sigma Art EF Mount 24-70mm F2.8

*photo tip: It can be difficult to take a picture of a pika since they are small, they blend in with their backgrounds thanks to their natural color, and they tend to keep their distance from the main trail. It can be hard to get close to a pika without startling it, so it would be best to bring a 70-200mm lens for the extended reach.
Shot on Canon R8 - Pika On The Rocks
Shutter Speed: 1/400sec
Aperture: F2.8
ISO: 500
Lens: Sigma Art EF Mount 24-70mm F2.8

Just before entering the clearing for Comet Falls, the path leading up to the falls is traversable by a narrow, slipper foot bridge and smooth, shiny rocks. Be careful during this portion of the trail as one wrong slip can mean getting carried away by the water or taking an unpleasant fall. After clearing the last two trials, you will find a pleasant surprise as a milky white and slender fall cascading down the mountain appears in sight after entering the opening.
Shot on Canon R8 - Comet Fall
Shutter Speed: 1/160sec
Aperture: F2.8
ISO: 320
Lens: Sigma Art EF Mount 24-70mm F2.8
*photo tip: there’s a couple ways to take a photo of the fall. Either go wide and use something to the effect of a 35mm lens and capture the whole scene. Or if you want to focus more on the fall with and include a bit of the surrounding environment, then a 70mm lens and up would work better.

Comet Falls itself was simply beautiful. The trail heading up to Van Trump Trail has an opening that leads right under the fall itself - providing an excellent photo opportunity to demonstrate the scale of the fall compared to a human. Proceed with caution if you want to stand under the fall as the rocks are round and slippery with the unstable mud ready to give way without a moment’s notice.
Shot on Canon R8 - Chasing The Comet Waterfall
Shutter Speed: 1/250sec
Aperture: F2.8
ISO: 320
Lens: Sigma Art EF Mount 24-70mm F2.8
After snapping a couple photos at this location and enjoying our snacks, we decided to turn back and get an early start on the journey home. I believe the rest of the trail leading back to the parking lot is harder to traverse. The trek back can be difficult since the declines are steep and wide. It would be best to use a trekking pole to help distribute weight and alleviate pressure on the knees. Additionally, early riser hikers become more apparent on the trail making it difficult to share the path with minimal turnouts. Overall the trail took us 5 hours to complete as we took our time enjoying and taking photos of the natural scenes. Although we couldn’t hike Van Trump since we were on a time crunch, it’s certainly on the bucket list for next time. From Comet Falls trailhead, we made our way back to Seattle coming back the same way we came in - cutting through the town of Ashford and following the signs for the major highways.
Notable Mentions:
There’s a couple last minute mentions I’d like to share regarding food. The food choices in and around Mt. Rainier are not diverse. Usually you can find American style restaurants serving mostly burgers, pizza, and sandwiches with bits and pieces of food choices from other ethnic backgrounds. Other than the food options listed below in addition to Wildberry, there’s not much else I would recommend. Instead, I’d highly recommend bringing a cooler with food to last you for however long you’re staying or visiting the Ashford General Store when you’re in a pinch for food options or general supplies.

Rainier BaseCamp Bar & Grill - An outdoor American restaurant with plenty of open space, local beers on tap, and a variety of menu options including pizza, burgers, sandwiches, and hot dogs.
Photo: Bratwurst with Fries

Cruiser’s Pizza - Cozy American pizza joint located in the town of Packwood. Great selection of pizzas loaded with toppings while serving burgers and sandwiches as well.
Photo: Pastrami Sandwich With Tater Tots
Afterword:
For my first trip around Mt. Rainier, I’d say it was pretty successful. Although there was more I wanted to do each day in addition to what we’ve already done, I decided it would be best to not overload the itinerary and instead take it easy. Speaking of easy if you’re not accustomed to hiking long trails at high elevations for consecutive days, the after effects can be difficult to deal with. After my 4 day trip, my legs felt tight since they weren’t used to this level of activity (don’t forget to stretch before and after an exercise to relieve tension). On a positive note, I’d like to think of the tingly feeling in my legs as a lasting memory of Mt. Rainier until the next time I run it back.
As a photographer and nature lover, I love sharing with you the beauty our planet has to share. A couple things that felt a little disheartening to see while trying to enjoy the outdoors is the abundance of trash scattered throughout the park. To respect our environment, Leave no trace (or LNT for short) is a set of guiding principles that outlines ways to be mindful of the outdoors and leave it better than we found it. I’m not sure the next time I’ll return, but I’m sure to be back to explore more and share with you. I hoped you enjoyed this lengthier blog post and in the meantime, safe travels and happy trails ~

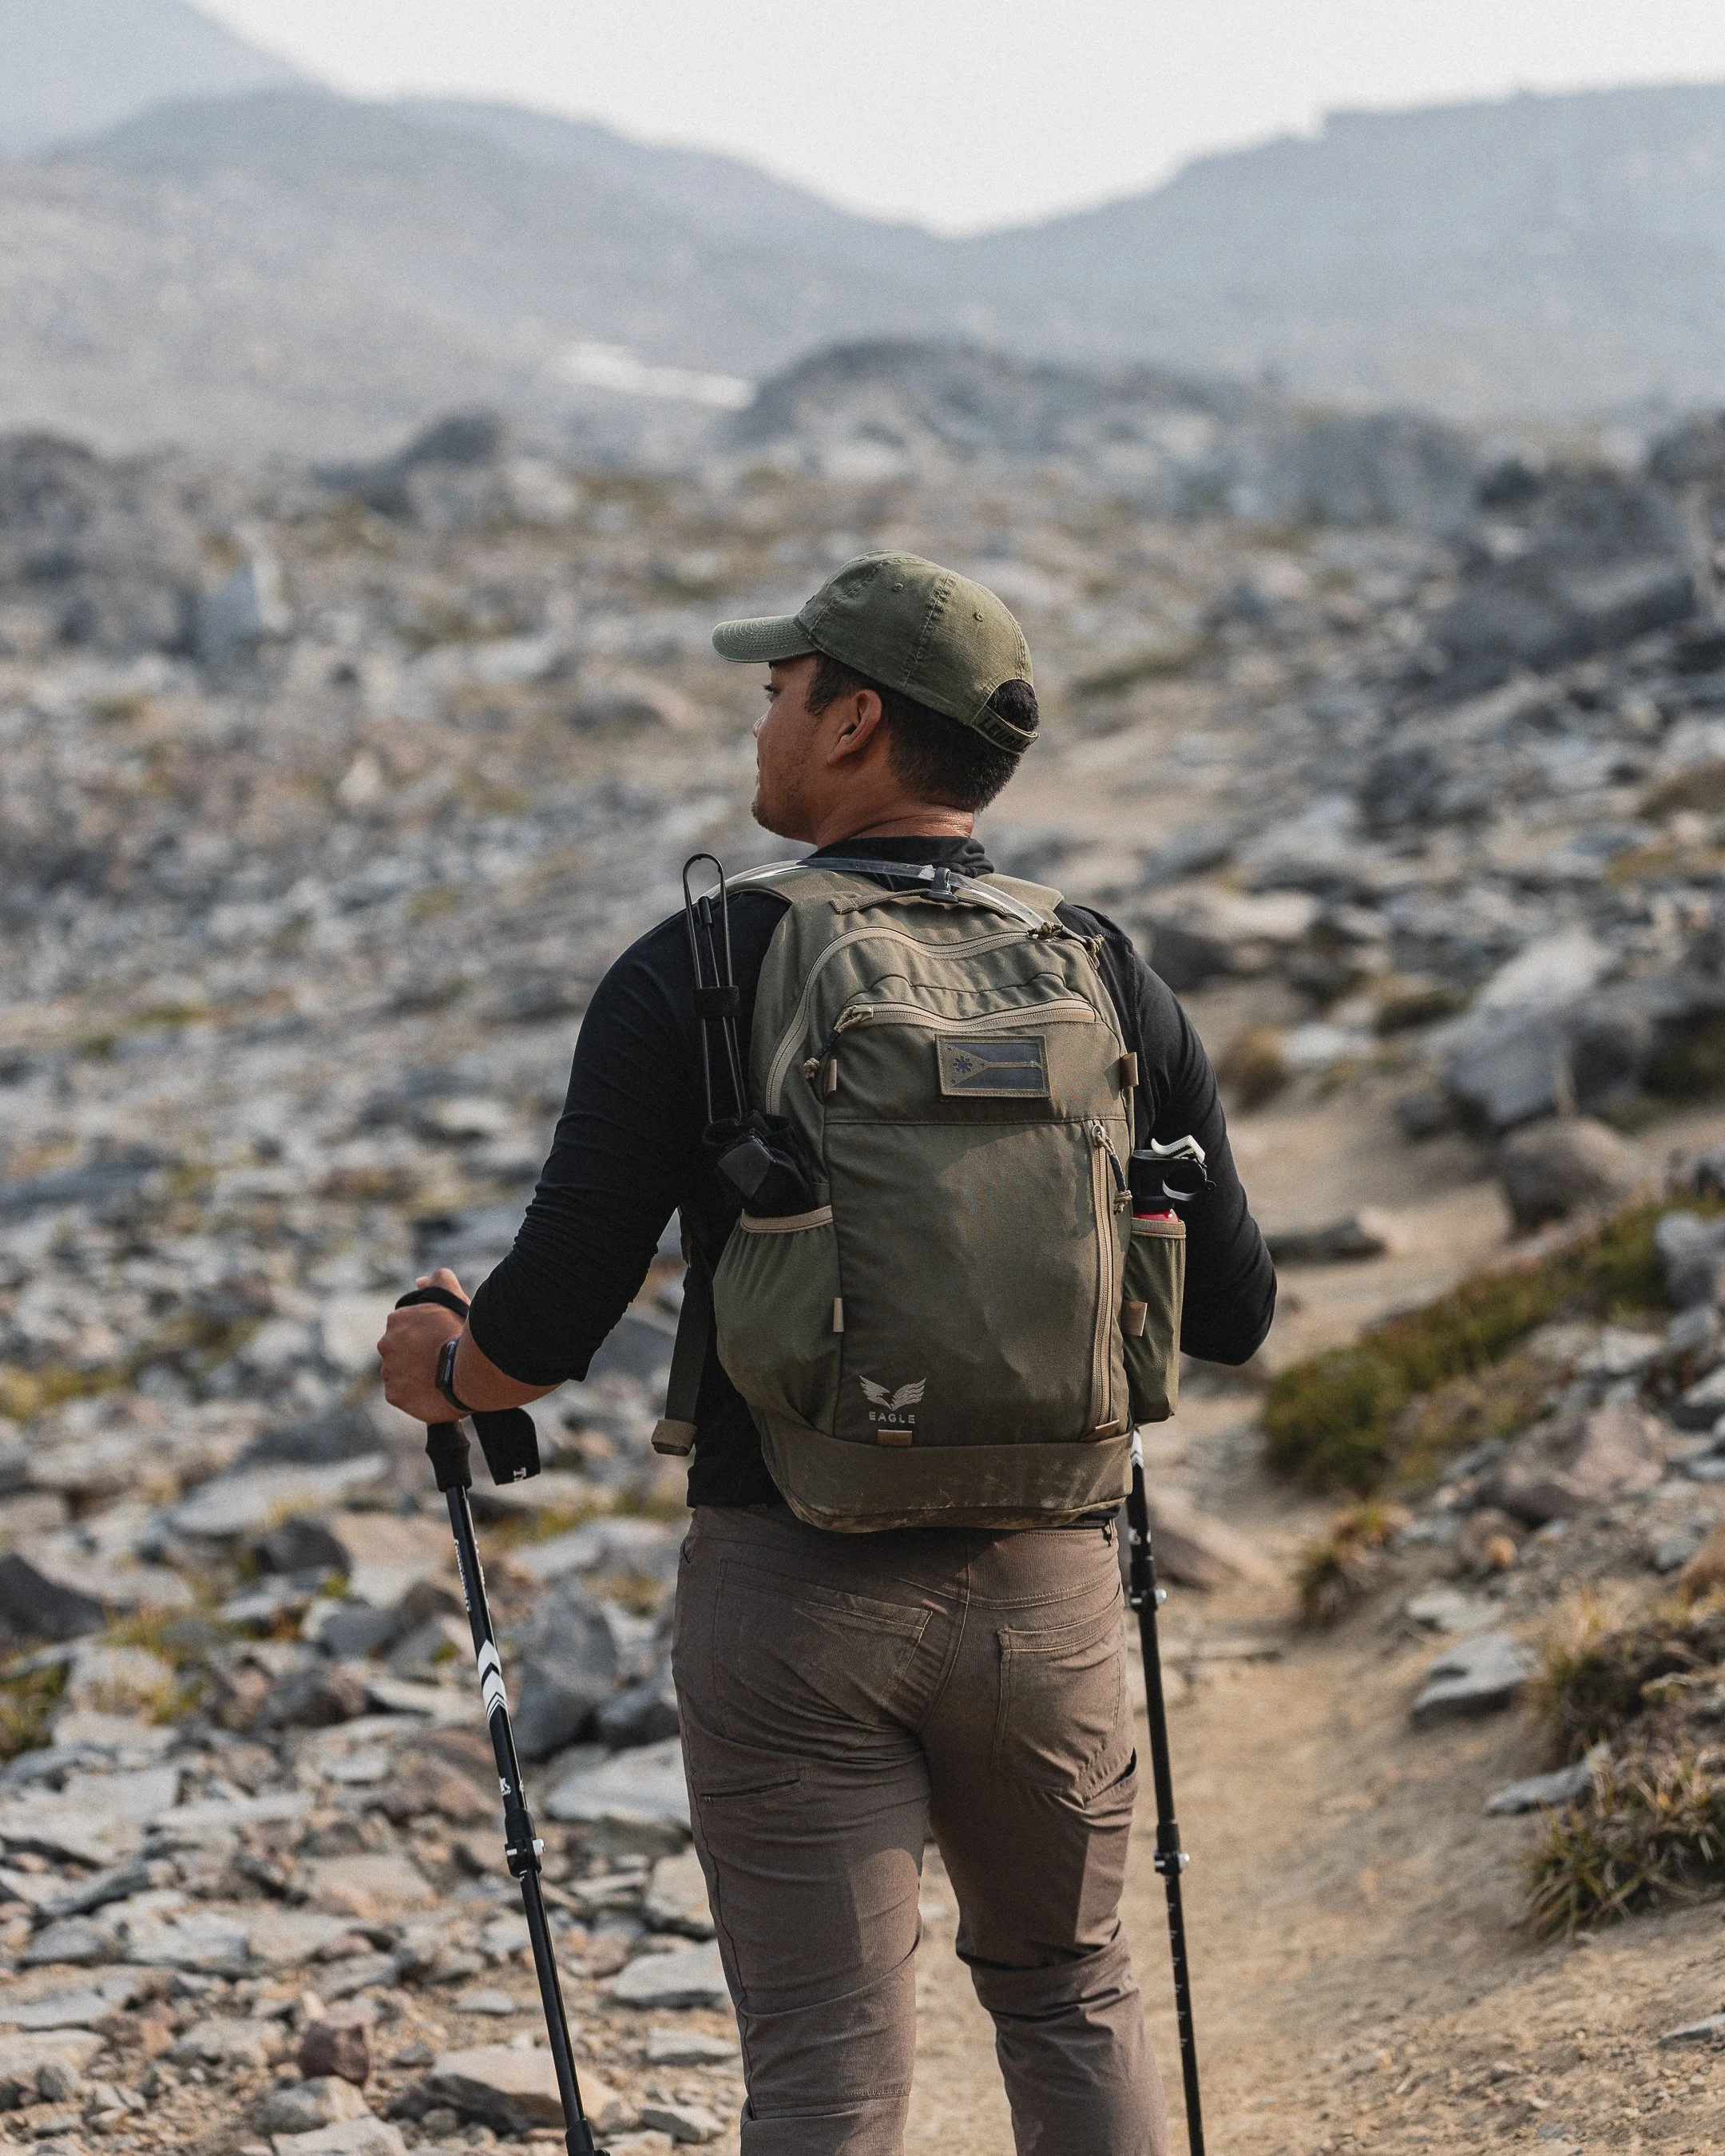
Shot on Canon R8 - My cousin, Christian, taking it all in at Naches Peak Loop Trail
Shutter Speed: 1/250sec
Aperture: F2.8
ISO: 320
Lens: Sigma Art EF Mount 24-70mm F2.8
*All pictures were taken by me on the Canon R8 and edited with Adobe Lightroom.