A Walk Among Redwood Giants

Shot on Canon R8 - Upward shot of the redwoods on the Lady Bird Johnson Trail
Hey everyone, great seeing you all again for another segment of exploring beautiful California! This time around I’ll be taking you on a trip to Redwood National and State Parks - specifically I’ll be talking about my time in Prairie Creek State Park. Like in my usual blog posts, I’ll be sharing tips on
What you should know and pack before heading up to the park
Scenery and activities you can do during the summer time
Prime photo locations to look out for while you’re out and about

On this trip my photographer friend, Oliver Palopo, tagged along as well. If you’re not familiar with Oliver’s work, his photography primarily focuses on landscapes. You can check out his work on Instagram @opalpo and his website oliverpalopo.com for more of his content. Not only does he have amazing vision, but is also a great advisor on how to prepare for outdoor adventures too! Along this 3 day road trip, we explored many different parts of Highway 1 and 101 on our way to and from Redwood National and State Parks. In the Daytime Activities section, I’ll be sharing our experiences on the day of the park. The Points of Interest will highlight our photo locations and places we ate at during our trip. On that note, let’s hop right in!
Shot on Canon R8 - Oliver exploring the Karl Knapp Trail
Shutter Speed: 1/3000sec
Aperture: F1.8
ISO 100
Lens: Sigma Art EF Mount 24-70mm F2.8
Before You Go:
Redwood National and State Parks is comprised of 4 separate parks - Redwood National Park, Jedediah Smith Redwoods State Park, Del Norte Coast Redwoods State Park, and Prairie Creek Redwoods State Park. Spanning over 130,000 acres of land, there is a ton of ground to cover, plenty of campsites to stay, and lots of fun activities to check out. It’s also worth mentioning even though I brought my handy dandy America The Beautiful pass, I didn’t end up using at Prairie Creek State Park it as there are no entrance fee at this location. However, there are exceptions of entrance fees in certain areas - more information can be found HERE. If you’re visiting this particular section of the park for a daytrip, then I got an itinerary for you.
Gear To Bring:
Day Apparel:
Burton Flannel Shirt
Name of the game when visiting the northern redwoods is packing a three layer clothing system. Although a two layer system can be sufficient, temperatures (in Fahrenheit) can fluctuate around the mid 60s or high 50s. You can expect plenty of fog and wet conditions even during the summer. I suggest bringing three layers because even if you get too warm, then you can simply shed a layer without risking not having enough clothes on hand.
Kicking off our gear list, we have the Smartwool Thermal Merino Base Layer. As an avid user of the brand 32 Degrees, my preferred outdoor layer has now become Smartwool. A big advantage of Smartwool is their odor control fabric. Even when hiking through the redwoods for hours, the merino wool does a great job managing sweat, dries faster than cotton, and handling the odor built up by bacteria . Although cotton and other materials like polyester can be less expensive compared to merino wool, they doesn’t hold well managing odor after prolonged usage while taking longer to dry once after getting wet.
For my midlayer I went with a simple cotton long sleeve flannel shirt by Burton and the Rab Xenair Alpine Light Jacket for my outerlayer. Between all three layers, the midlayer can be the most flexible piece. If you begin to run hot, then you can shed off the mid layer and keep the base layer and the outer layer on hand. Usually, the outer layer is your most technical piece and should be able to withstand harsher climates. The cornerstone of my outer layer apparel is hands down the Xenair Alpine Light Jacket by Rab. The jacket itself is super lightweight, plenty warm thanks to Gold+ Insulation by Primaloft, packable into itself , and water repellent thanks to a DWR (durable water repellent) finish.
Moving on to bottoms, I went with the sturdy Fjallraven Keb Agile Trouser. With reinforced fabrics on the knees, inner ankles, and pockets, it’s a durable pair of pants. Relative to the Rab Incline Light pants I brought to Yosemite, the Fjallraven pants are on the heavier side and are baggier around the calf and ankle areas. Nonetheless, the G-1000 material making up these pants shines in tough conditions - withstanding blowing winds, protecting the skin from UV rays, and quickly drying with its water resistant properties.
To summarize, you will want to bring a warm set of clothes you can layer up with and a jacket that can help repel mist - not necessarily waterproof but water repellant at least. You don’t need to worry about harsh sun rays as the fog can help diffuse light, making for a colder atmosphere. You can get away without bringing any thermal pants and instead roll with a pair of sturdy pants. For shoes, bring something that can get down and dirty as conditions can get muddy.
Camera Gear:
Samsung S22 Ultra
Not much has changed in my camera gear setup except for two key pieces of equipment - the DJI Mini 3 and the Anker 335 Power Bank. As a beginner drone pilot myself and someone who isn’t trying to break the bank, the Mini 3 has been one of my most solid investments. For $858 before tax and other applicable fees, you can get yourself a drone that is simple and reliable. Additionally, the fly more combo comes with two additional batteries, spare rotor wings, a controller with a built in screen, and its own dedicated travel sling to hold all your gear in one place.
For power on the go I can always trust my Anker 335 Power Bank. At the same size as my Samsung s22 Ultra, I can ensure my phone and other electronics are fully charged thanks to its massive 20,000mAh capacity and two output port setup.
Planning The Trip:
If you’re coming from Santa Clara County, you can expect a one-way trip to last you about 6 and a half hours, whether you’re taking Highway 101 or Highway 1. Heading up, we took Highway 1 after making a few detours along the way. As scenic as Highway 1 can be, it’s also a challenging road to traverse if you’re not familiar with it. Long, windy roads, the potential of deer jumping onto the highway, poor phone signal, and dangers of rock slides pose as potential dangers. Ideally, avoid driving this road at night as it’s also not a well lit road whatsoever.
During this 3 day, 2 night trip, we found accommodations in Fort Bragg for one night and in Eureka for another night thanks to booking through Airbnb. In searching for accommodations around the park in a neighboring city, I would suggest Eureka as a great location to start your search. On top of being just an hour drive away from the Prairie Creek Visitor Center, there’s plenty of lodging and more things to do compared to the other, smaller neighboring towns. While I was searching for places to stay near the southern end of the park, I noticed that pickings are slimmer in Orick and Trinidad compared to the bigger city of Eureka. If you’re into camping at the park, then you can find more information about fees and passes HERE.
On the return trip back, we took Highway 101 South as it’s a direct shot back home with the added bonus of visiting Avenue of the Giants. Although Highway 101 is a much smoother and less windy road than Highway 1, be extra cautious as there are still plenty of fast drivers on the road. And unlike Highway 1 having only one lane in both directions, Highway 101 has multiple lanes. Nonetheless, speeding is pretty prevalent as CHP officers often lie in wait on straightaways.
Daytime Activities:
Like I mentioned earlier on, there’s over 130,000 acres of land when looking at all 4 parks as a whole - so there’s never a shortage on the amount of places you can explore. One of the best tools I use to help me figure out which trails to take has to be All Trails. Simply type in the name of the park, or the name of a specific trail you’re interested in, and All Trails can give you a break down of conditions, elevation, and difficulty level in addition to input from past hikers. Before hitting the Prairie Creek Visitor Center, which is the start of the Karl Knapp trail, we tried our luck seeing the Roosevelt Elk at Elk Meadow. Unfortunately, we struck out as there weren’t any elk when we arrived around noon. Speaking of the Elk Meadow, just beyond this area is the Gold Bluffs and Fern Canyon along the coastline. The Davison Road, the passage leading to the bluffs, only allows a certain number of people on a given day and can only be accessed by permit holders. To manage safety for park goers, a reservation is required as the coast is subjected to potential high tides and tsunamis - more information can be found HERE.

Within Prairie Creek Redwoods State Park, we settled visiting the Karl Knapp and the Lady Bird Johnson trails. Both trails are very easy traverse as there aren’t any steep inclines. The Karl Knapp trailhead can be accessed through the Prairie Creek Visitor Center. Although parking by the visitor center is limited to the main highway, there are plenty of spaces to occupy on both sides. As we wandered through the Karl Knapp Trail heading to the Big Tree Wayside we were surrounded by an abundance of ferns on each side of the trail. As cool as the scenery was, I couldn’t help but think that we were in some Alien movie - imaging the ferns would attack us to recreate clones to continue their survival on Earth. Maybe I was looking too much into it, but to simplify things, the place felt quite surreal.
Shot on Samsung S22 Ultra - “blessed tree” heading towards Big Tree Wayside
Shutter Speed: 1/90sec
Aperture: F2.2
ISO 100
Lens: 13mm ultrawide

*Bonus* Something to look out for while hiking are banana slugs! Just on the Karl Knapp Trail alone, I was able to count 17 banana slugs. Usually they like to hang around in redwoods and in cool, damp climates. As someone who attended college in the redwoods in Santa Cruz, I can confidently point out the banana slugs in the north are of a darker yellow compared to the vibrant yellow banana slugs just south of Highway 17.
Shot on Canon R8 - banana slug hanging from a branch along the Karl Knapp Trail
Shutter Speed: 1/80sec
Aperture: F3.2
ISO 400
Lens: Sigma Art EF Mount 24-70mm F2.8

Another hike worth visiting is the Lady Bird Johnson Trail. Between this trail and the Karl Knapp Trail, I have to say this would be my favorite between the two. The dense fog, deep, desaturated colored foliage, and stillness of the woods felt like standing in Pandora from James Cameron’s Avatar series. The lack of human presence and the quietness of nature combine for the perfect disconnection from the typical hustle and bustle from city life. The ground is much wetter and the temperature is colder relative to the Karl Knapp trail. Be mindful of bringing some quality hiking boots that can get down and dirty in tandem with a quality water resistant jacket to repel the mist.
Shot on Canon R8 - Oliver exploring Lady Bird Johnson Grove Trail
Shutter Speed: 1/60sec
Aperture: F2.8
ISO 400
Lens: Sigma Art EF Mount 24-70mm F2.8
Remember how I said earlier we struck out on finding elk at Elk Meadow? Let me tell you, how lucky Oliver and I got on our way back down to our Airbnb in Eureka. As we’re driving back down Highway 101, we were able to see Roosevelt Elk grazing by the Elk Country RV Resort and Campground. Respect the space between you and these majestic creatures as they can be defensive and aggressive - especially when their calves are around. Be careful of your speed on the highway too as we almost heard a collision between an adult elk and a SUV just as we’re leaving the scene.
Points of Interest:
There were many locations during our trip that, while adding more travel time, made the journey all the more enjoyable. I’m excited to share some prime photo locations and restaurants that are certainly worth checking out.

Location #1: Hawk Hill used to be a military bunker established back in WWII. Although the anti-air and radar facilities are out of commission, the remnants of what once was still remains. Here you’ll find an amazing 360 degree view of the San Francisco cityscape - granted Karl the Fog isn’t around. It can get pretty windy and chilly up here so pack a quality windbreaker if you intend to stick around for a bit.
Shot on Canon R8 - Oliver overlooking the Golden Gate on top of Hawk Hill
Shutter Speed: 1/2500sec
Aperture: F2.8
ISO: 100
Lens: Sigma Art EF Mount 24-70mm F2.8

Location #2: Trojan Point on Mt. Tamalpais, or Mt. Tam for short, is a definite must if you intend to travel northbound via Highway 1. Mt. Tam is just a hop, skip, and a 30 minute drive without traffic from Hawk Hill. Luckily, Oliver and I had the whole point to ourselves and with zero fog! Did I forget to mention how awesome it is to fly a drone here while recording a hyperlapse of the clouds rolling in? It’s pretty darn cool and worth spending some time here. Although the climb to the tree as shown in this picture is steeper than it seems, the views from atop a mountain are simply breathtaking.
Shot on Samsung S22 Ultra
Shutter Speed: 1/12000sec
Aperture: F2.2
ISO: 320
Lens: 13mm ultrawide
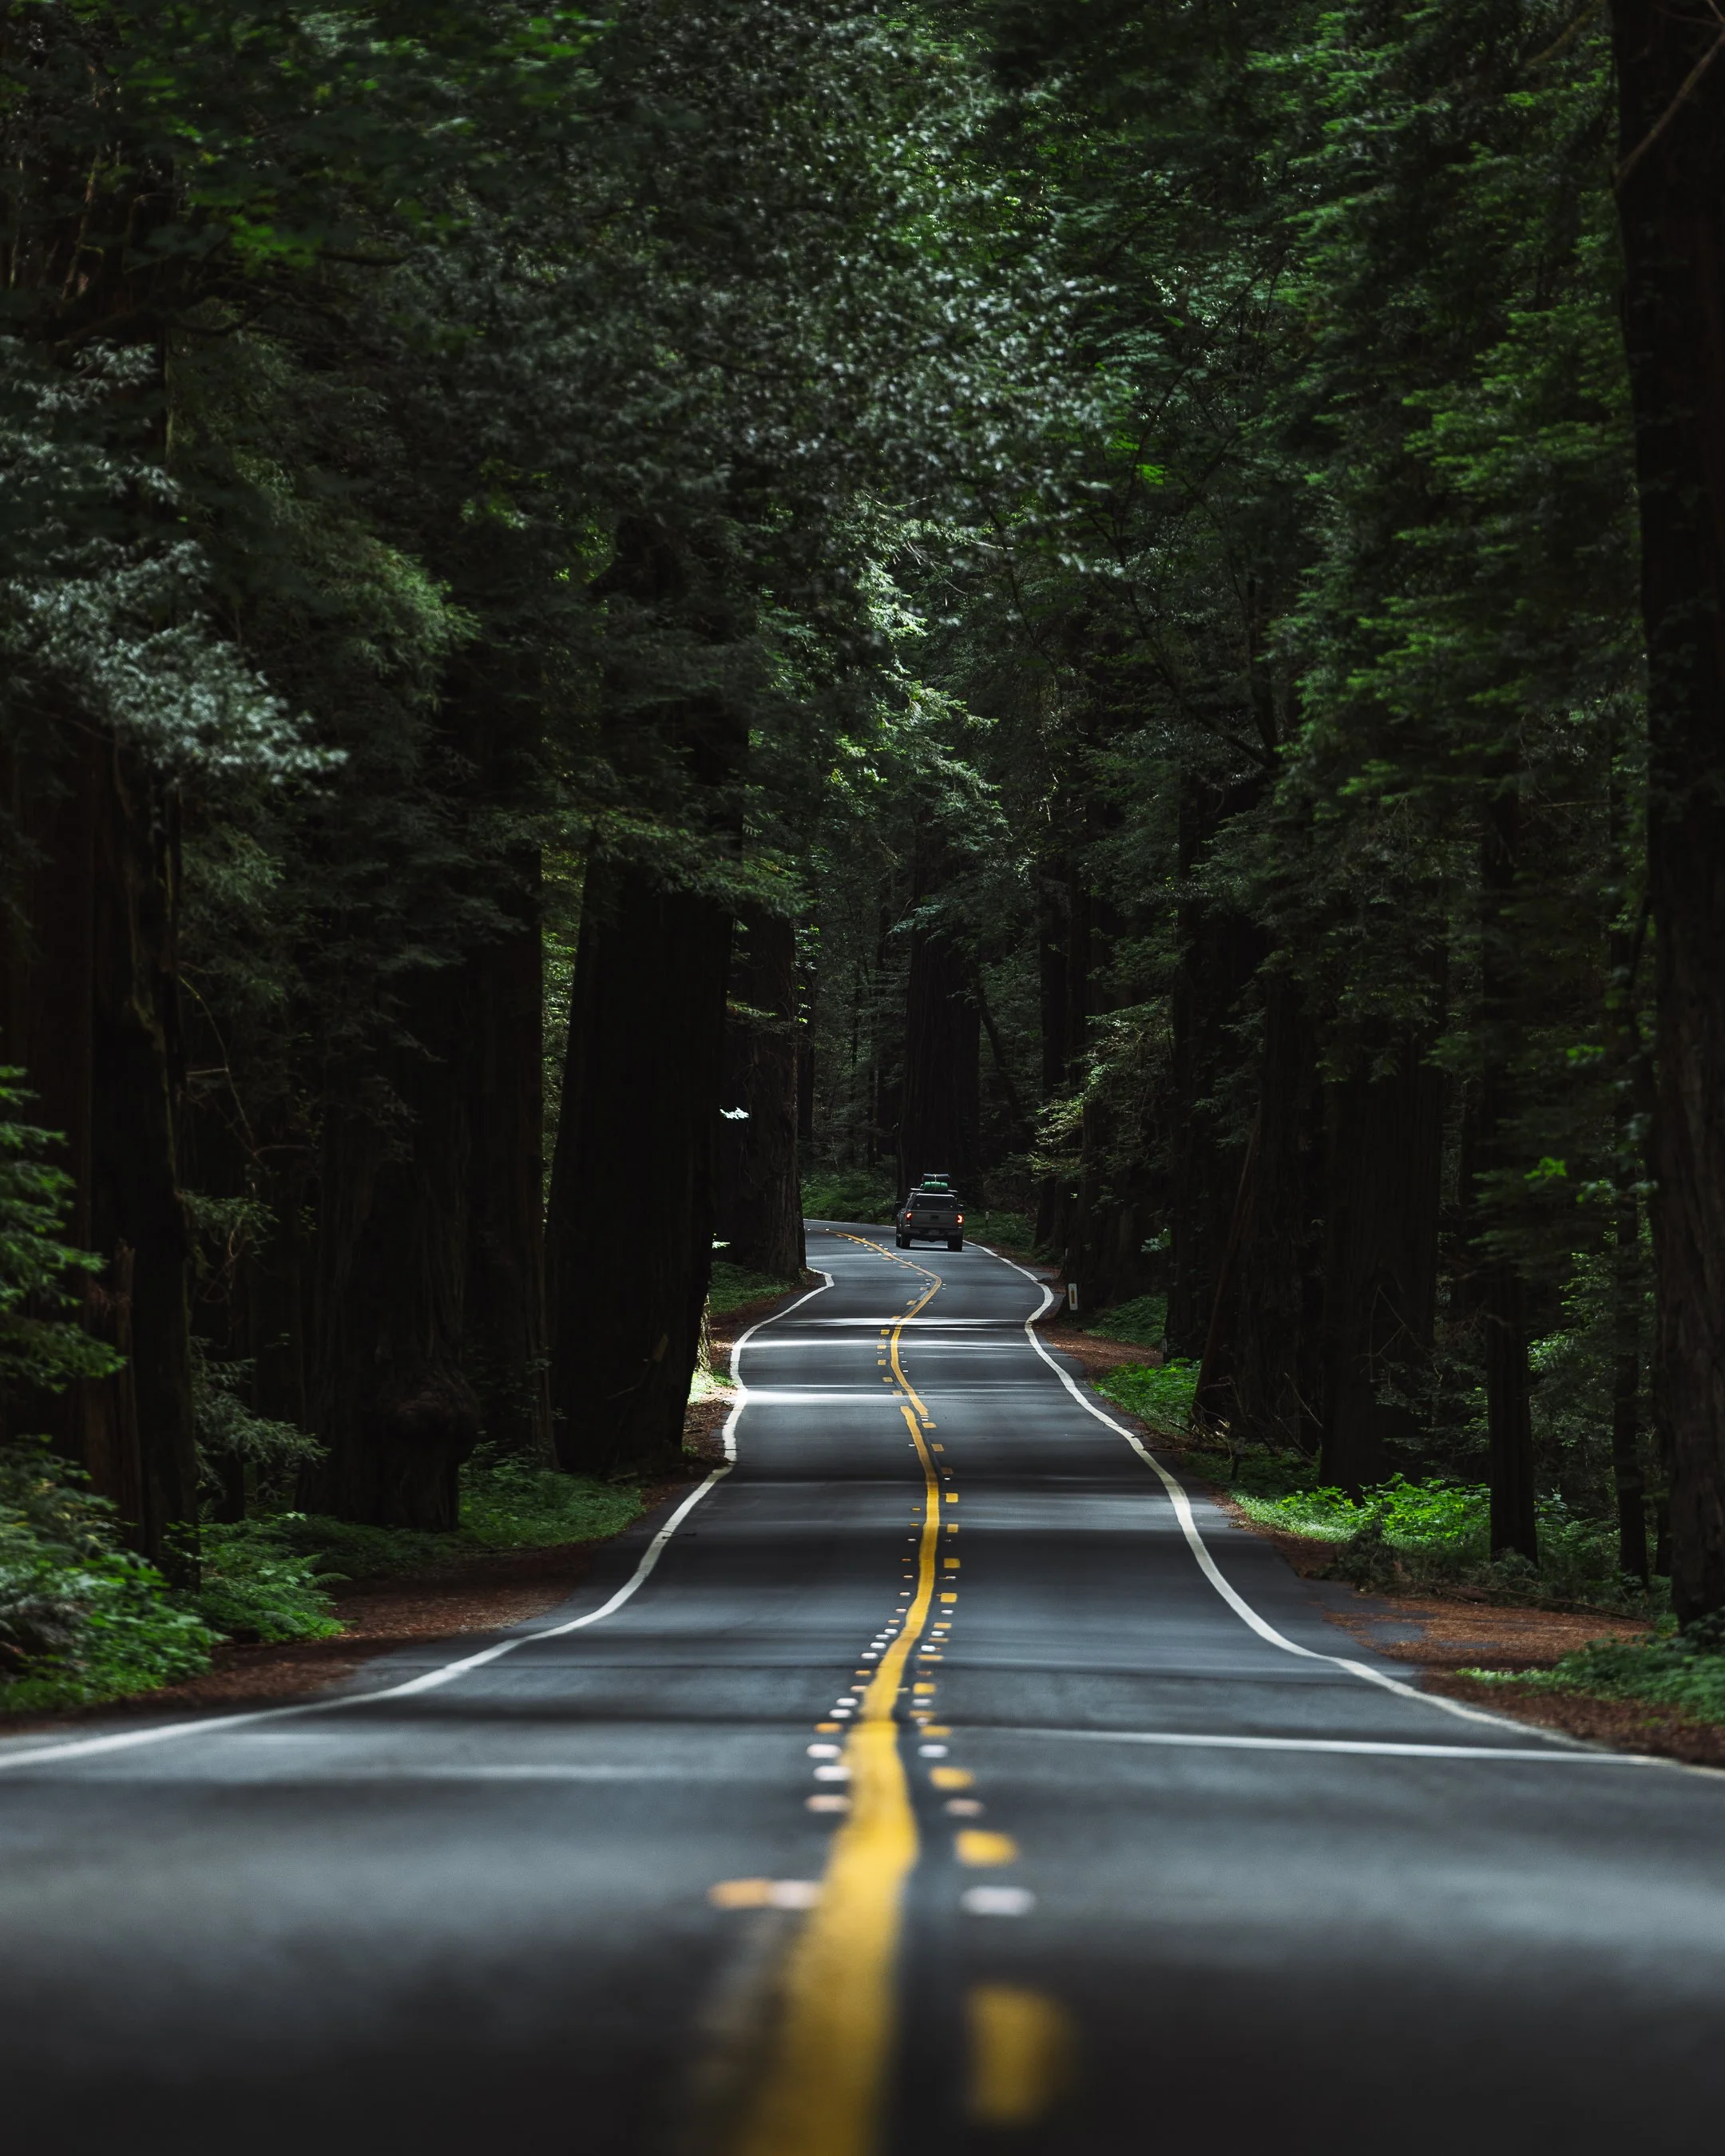
Location #3: Avenue of the Giants is a 32 mile drive with parts of the passage running parallel and weaving through Highway 101. In my opinion, driving down and starting from Pepperwood is the move. Relative to the rest of the windy drive, the Pepperwood point is the straightest passage and can make for some spectacular drone footage and photogenic shots. If you have a drone, try timing yourself on how fast you can barrel down the tunnel of redwoods. On the other hand, take to the skies and be one with the redwood giants. Be cautious of the stray branches during ascension as some drones, like the DJI Mini 3, do not have built in sensors to detect incoming surroundings.
Shot on Canon R8 at the Avenue of the Giants
Shutter Speed: 1/1200
Aperture: F2.8
ISO: 250
Lens: Sigma Sport EF Mount 70-200mm F2.8
Places To Eat:
Location #1: Parkside Cafe in Stinson Beach is only a 15 minute drive from Trojan point. Before hitting Highway 1 north, go ahead and grab yourself a fresh cup of coffee and your choice of a freshly made pastry or an artisanal pizza to go.

Location #2: Humbolt Smokehouse is a pretty solid BBQ joint just off Highway 101 northbound in Eureka.This place doesn’t play with their sauces, but with 5 different choices of BBQ sauces to choose from, it can be hard not to while you’re eating. If you’re looking to fuel up before hitting the redwoods, fill up with some brisket or burnt ends with a soda on the side.

Location #3: Raliberto’s Taco Shop has an extensive Mexican food menu with a variety of options to replenish the body after a long day in the woods. One of the few establishments that’s open until 11pm on the weekends, Raliberto’s shows up for when those late night cravings kick in. In my experience, the carne asada nachos and a horchata is just what the doctor ordered.

Location #4: The Alley Grill is by far a hidden gem located in the town of Ukiah. All I have to say is do yourself a service and grab a Double Double and a side of crispy, golden fries.
Things to Consider for Next Time:
If I had to pick a couple of things to watch out for my next visit, I’d say:
Getting a permit in advance to visit the bluffs and Fern Canyon is a top priority
Stick with the strategy of staying in one park for at a day and explore that area
Stay in or around the northern parks
Visiting the northern most part of Del Norte State Park would be high on my list. Although camping in the woods is on the table for a change of pace, spending a night or making home base in Crescent City is also a great option. Although a quiet town sleepy little town where things tend to close early, Crescent City is also a great getaway spot with cool scenery to check out. All I have to say is the way the sun sets past the Battery Point Lighthouse with low tide is just simply beautiful.
I hope you found this information to be helpful and for any questions, comments, or thoughts, feel free to connect with me via Instagram, LinkedIn, or through my email: nogueraadrian03@gmail.com. Safe travels everyone and thank you for reading ~
Afterward:
All photos presented in this blog were taken and edited by me. All images were edited on Adobe Lightroom CC.