Spending Half A Day In Yosemite National Park

Hey everyone, welcome back to another installment of exploring another National Park within California! In today’s blog, I’ll be
Talking about the camera gear and clothing I prepared for this trip
Showcasing the kind of scenery you can expect this time of year with the new Canon R8 and Samsung S22 Ultra
Sharing my own an itinerary you can use to plan your next trip to Yosemite on limited time

Before You Go:
One of the best tools you can use to help plan out your trip would be the Yosemite National Park site in addition to Google Maps. During May and June Highway 120, which connects directly to the valley, may be closed due to the snow melting from the winter season. Something else to consider that I didn’t realize until I arrived in the park was the amount of closures to certain areas within the valley. Some key attractions and areas may be inaccessible due to the danger of slippery surfaces or overflow of water.
Although the weather was on my side this time around, one key attraction I missed out on was the Swinging Bridge due to past season’s flooding. Although the water was quite high the time I went, it did work out to my advantage as the reflection created this beautiful landscape mirror shot of the surrounding scenery.
Shot on Samsung S22 Ultra In Swinging Bridge Picnic Area
Shutter Speed: 1/3000
Aperture: F1.8
ISO 100
Gear To Bring:
Let’s shift gears about what to wear and some of the gear I brought with me. Below is a list of my recommended apparel with links included:
Apparel:
If you’re not planning on camping overnight in the valley and intend to do daytime activities, then I’d suggest wearing clothes that are:
Lightweight
Breathable
UPF Protected
Wicks away moisture
Starting off with the Capilene long sleeve shirt by Patagonia, this piece has quickly become one of my staples in my closet for the summer time. The super lightweight material, the sun protection fabric, and amazing moisture wicking capabilities help me to stay dry and cool throughout the day without compromise. As an outer layer, I opted for the Denali Jacket by North Face as it’s both lightweight and warm. On top of those two qualities, the two chest pockets help me store and protect my lens caps and other personal belongings behind a water-repellant finish outer layer.
For bottoms, I can’t stress enough how good Rab’s Incline Light Pants are. These pants are super lightweight, provide a lot of stretch, and come with a DWR (durable water repellent) finish. Lastly, it’s hard to walk around for hours without some solid shoes. My favorite pair would be the North Face Vectiv Eduris II. They come with a durable, rugged outsole with a springy midsole that holds up well on the trail all the while providing great ventilation. The big downside to this pair is that they aren’t waterproof, or even water repellant.
Wearing a lightweight apparel setup helps a lot with managing weight as I tend to carry most of my equipment in my daypack. Below you’ll find what my carry looked like as I explored the Yosemite Valley.
Camera Gear:
Samsung S22 Ultra
For this expedition, I packed the new Canon R8 in addition to my best 2 travel lenses that I can use in any situation. The combination of the 24-70mm and the 70-200mm by Sigma effectively helps me cover a range of 24-200mm at the 2.8 aperture, which is more than enough to capture the landscapes of Yosemite. To carry all of my equipment, I opted for the Peak Design Everyday Backpack Zip. If you’re in the market for a camera bag then let me share with you a little on why the Peak Design Everyday Bag is a game changer. What I absolutely love about this bag is the flexibility to store my gear with customizable dividers, easy access to my equipment from 4 different areas, all the while covered with a weatherproof DWR (durable water repellent) finish.
Planning Your Route:
If you’re departing from Santa Clara County to Yosemite Valley, then the drive won’t be too difficult. Like I mentioned earlier, Highway 120 can be closed off in early spring due to the snow from the winter season. For my route, Google Maps suggested taking highways 101, 152, 165, and 140. Although this is just one of many ways to enter the park, it took me about 3 hours to complete the drive just one way. If you leave at 5am like I did, I can guarantee you will arrive at the sentry station at the end of highway 140 by 8am as you go against the traffic.
Something to be aware of when driving through route 152 is the road can get quite windy heading into Santa Nella. I remember driving through that passage in a Nissan Versa, and let me tell you the wind can be tough on a lightweight car such as that. Other than the rough winds on highway 152, the drive is pleasantly scenic. The hills and fields of the countryside glow in this magnificent golden yellow as the sun slowly rises from the east. Speaking from personal observation, I find it interesting how people commute over 2 hours from the inland on the weekdays to just to work in the bay area.

Daytime Activities:
There’s a lot you can see and do within the span of 4 hours and even more to do if you have the chance to stay longer. Although I would love to stay longer, it can be quite difficult to find overnight accommodations in and around Yosemite during the summer time. It would be best to reserve accommodations months in advance as early summer is prime time for students finishing school and families taking time off to travel. For more information about what’s available within the valley, check out the Lodging section from the National Park Service Site or Travel Yosemite.
Shot on Canon R8 along the Merced River
Shutter Speed: 1/1600
Aperture: F3.5
ISO 100
Lens: Sigma Art EF Mount 24-70mm F2.8

If you’re coming in from route 140, then you’re guaranteed to at least see 4 waterfalls by looping around the Merced River. You should be able to see Bridalveil Fall, Lower Yosemite Fall, and Horsetail Fall from the road without getting out of your car. The only waterfall that requires you to get out of your car would be the Staircase Fall from Curry Village.
Shot on Canon R8 In Curry Village
Shutter Speed: 1/320
Aperture: F3.5
ISO 100
Lens: Sigma Art EF Mount 24-70mm F2.8

Passing by Curry Village is an excellent rest stop as there’s a couple places to eat within this lodging area in addition to shops selling outdoor apparel and gear. Before hitting the road again, make sure to spot Half Dome peeking through the trees on the northside of the village.
Shot on Canon R8 In Curry Village
Shutter Speed: 1/1600
Aperture: F3.5
ISO 100
Lens: Sigma Art EF Mount 24-70mm F2.8
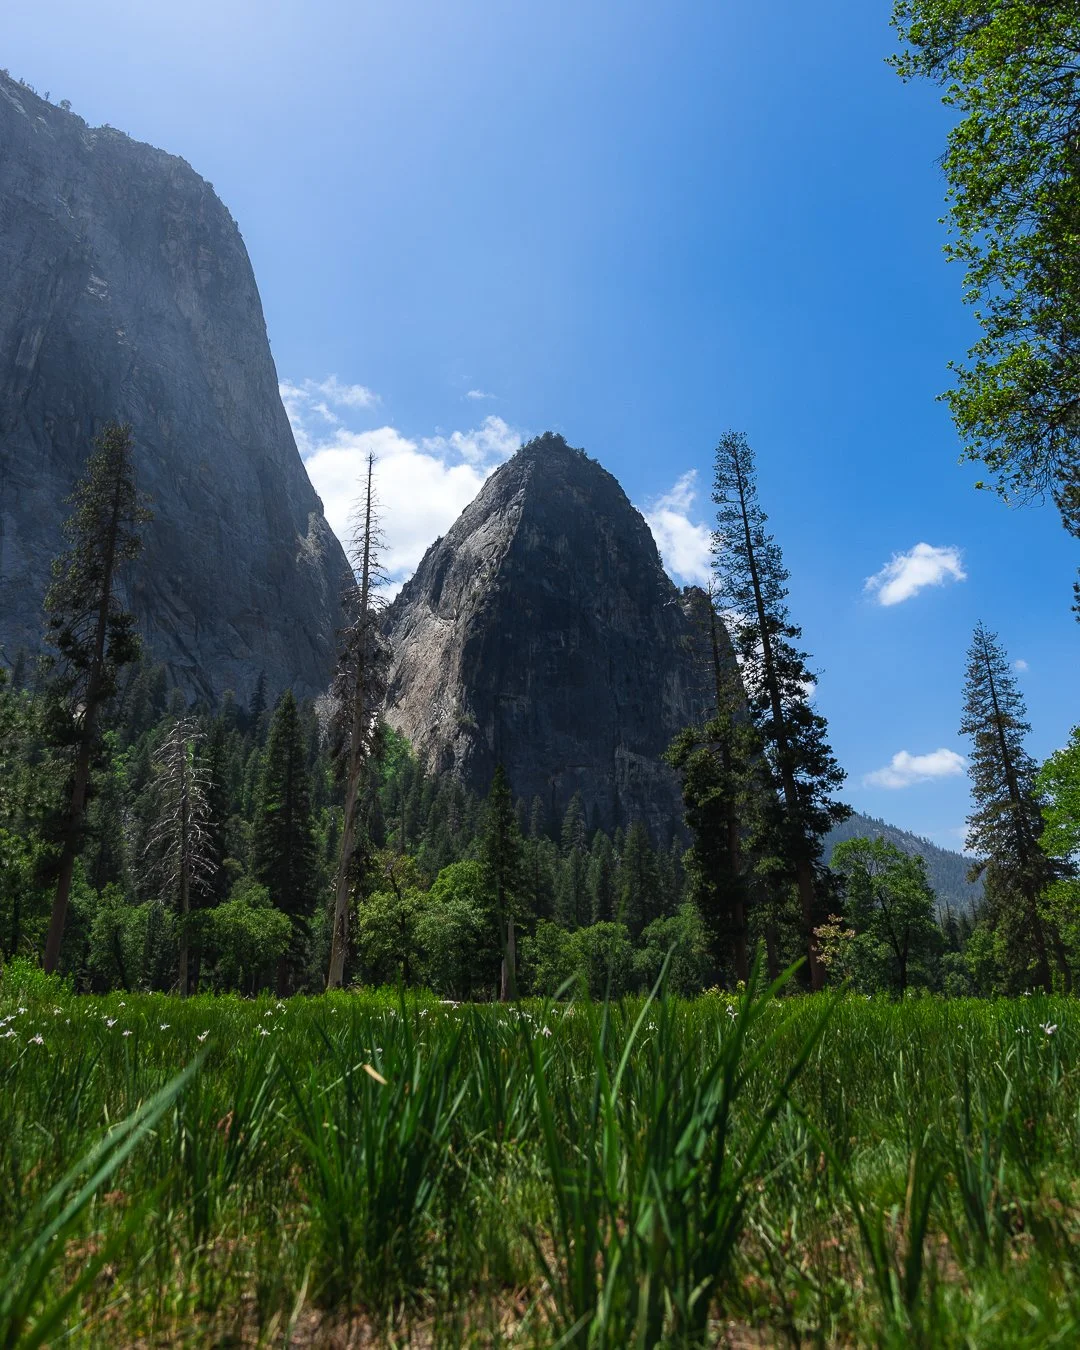
Continuing along the loop on the top side of Merced River, a few key spots I’d highly recommend checking out include Yosemite Village, Yosemite Falls, and the El Capitan Meadow. I think driving from Yosemite Village back to the highway 140 entrance is a prettier drive than heading westward of the Merced River. There’s lots of outlets along the road to allow cars to pass on this one way road, but some of these outlets can provide some spectacular views. One of my most favorite views along the top side of the river is the El Capitan Meadow. If you’re looking to get away from the crowds or have a meal someplace in the valley, I’d highly suggest doing it here. The vibrant green grass, open blue skies, and minimal travelers make this spot one of the most ideal places to kick back and relax.
Shot on Canon R8 In El Capitan Meadow
Shutter Speed: 1/500
Aperture: F5.6
ISO 100
Lens: Sigma Art EF Mount 24-70mm F2.8

Things To Consider Next Time:
Yosemite National Park has so much to offer in terms of views and activities. As a first time run in the valley, I’m quite satisfied with how my trip turned out. If I could go back in time and visit Yosemite Valley for the first time with the knowledge I have now, I would have tweaked the itinerary differently. For starters, I park my car in a lot and instead make the loop around the valley via bike. Navigating through traffic once you’re in the valley can be difficult as there are lots of one-way roads in addition to crowds of pedestrians in the village areas. I’d say being nimble when on the road is the name of the game when exploring the valley. Thankfully, Yosemite Valley is super bike friendly as most motorists don’t tend to speed on the roads.
Don’t worry if you don’t own a bike or don’t want to transport a bike to the valley. There’s options to rent bikes inside the valley itself - you can find more information about the park’s policies and bike rentals on the NPS website.
In terms of weather, I was super lucky with how the conditions turned out. Like I mentioned earlier, I wish I had a meal prepared or a lounge chair on hand when I visited the El Capitan Meadow. On top of that, I should’ve worn better hiking shoes that are waterproof. The meadow itself was still marshy so I couldn’t trek too far without mud or water seeping into my shoes.
Shot on Canon R8 Lower Yosemite Fall
Shutter Speed: 1/800
Aperture: F4.5
ISO 100
Lens: Sigma Sport EF Mount 70-200mm F2.8
Final Note:
As a born and raised Californian, it wasn’t until my 24th trip around the sun was I able to explore this magnificent place. Living in California is such a privilege given how commuting to different parks is only hours away. There’s so much to explore and I’m happy to share what I know with travelers, photographers, and adventurers alike. When I visit again, I’ll be sure to share more stories, tips, and photos about my time here during the different seasons. If you’re a first time visitor to the park, then I hope you find this guide helpful. To keep up to date with my latest posts, you can always check out my Instagram page, kuya_adrian, for more! All the photos you see are edited in Adobe Lightroom CC. In the meantime, safe travels ~